While many homeowners and hobbyists attempt finishing interior wood furniture, trim and cabinets, few achieve the results they’d hoped for. At least this is certainly the way it looks given all the emails I get about wood finishes gone wrong.
Chances are you’ve never heard of at least some of the five interior wood finishing tips I’ll show you here, any one of which could make a big difference to your results.
#1: Sand wood correctly
No wood finishing liquid can create great results if applied to poorly sanded wood. Correct sanding involves progressing through all the levels of abrasives in order, ideally with some kind of power sander.
Sandpaper is rated with “grit” numbers — 80-grit being the coarsest for general woodworking, going to 120-, 180- and 220- or 320-grit as a final step.
Properly finished wood will have no cross-grain scratches showing. Shine a bright light at a shallow angle on the wood to highlight any remaining flaws. All you should see is beautiful wood grain.
In most cases, I like to begin sanding with an 80-grit abrasive on a belt sander, followed by 120- and 180-grit in a half-sheet sander, finishing up with 220- or 240-grit sandpaper in a quarter-sheet finishing sander.
#2: Use sanding sealer
This is the best kept secret in the wood finishing world because sanding sealer makes for smoother results when used before urethane or other protective coatings. Sanding sealer is applied to bare, sanded wood, it dries quickly, and it’s made to fill the pores of wood, while also being easy to sand smooth.
It’s like a foundation for any kind of urethane wood finish and leads to smoother final results. This is especially true with open-grained woods such as oak and ash.

#3: Complete a test panel
If you’re not entirely familiar with how a certain finish behaves in the workshop, don’t gamble. It’s always wise to take the time to prepare a fully finished test panel using the same wood that your project is made from, if you’ve never finished in this way before. Complete a full application, including all stains and sealers you’ll use for the final project.
There’s no need for this step if you’ve applied this kind of finish successfully before, but don’t risk your project on an unproven combination of finishing liquids. I know from experience that stripping an ugly finish that you just applied is no fun at all.
#4: Sand between coats
If there’s one essential to remember, this is it. Sanding between coats removes the extra roughness that appears on wood after the first couple of coats of urethane, varnish or shellac dries. Wood fibres tend to swell, rise up and harden that way after they soak in finishing liquids and this is what sanding between coats removes.
I use 220- or 240-grit sandpaper for this and just a few strokes in any one given spot does the job. Vacuuming the surface after between-coat sanding is the best way to make everything dust-free before the next coat.
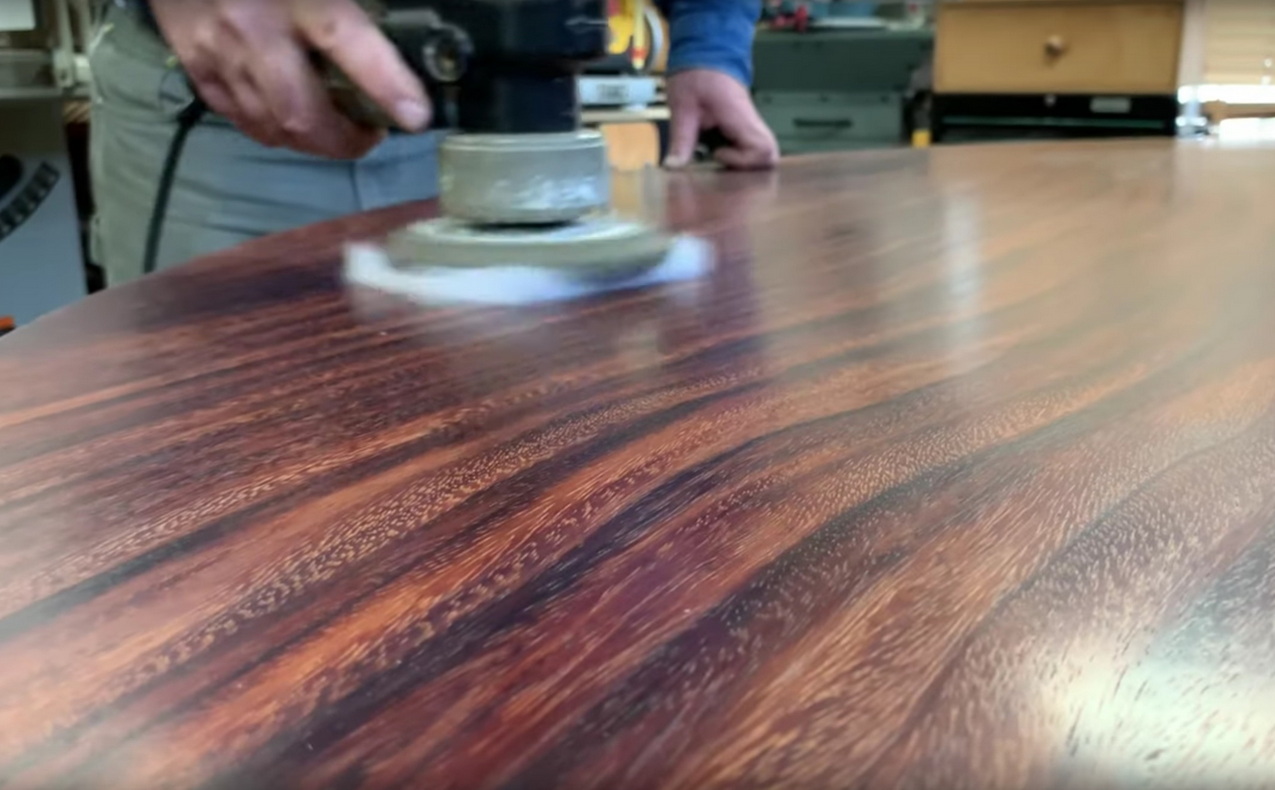
#5: Power buffing as a final step
This is optional, but highly effective at turning a very good wood finish into an outstandingly smooth and flawless one. The process is simple, too. Put the right kind of abrasive pad on the wood, place a random orbit sander on top of the pad, then switch ON.
The sander works the pad over the surface, making it exceptionally smooth. A fine abrasive pad yields a nice, matte finish, while a super-fine pad produces a deep gloss.
Here’s a video on power buffing wood finishes. Even experienced woodworkers I know are amazed at the glass-smooth results possible with this approach: