 There’s no better time than right now to make your dryer safe from fire by cleaning its build-up of lint.
This is a DIY home maintenance project that should be done regularly.
Here’s what you need to know about keeping your dryer safe from fire.
The National Fire Protection Association (NFPA) estimates that almost 14,000 fires are caused each year by clothes dryers. The fires result in deaths, injuries and millions of dollars in property losses.
Dryer lint alone causes more than a quarter of these fires, says the NFPA.
MORE: Prevent a fire in your home with some basic precautions
Cleaning the dryer, which also helps it run more efficiently, is pretty straightforward.
Your best bet is always to follow the cleaning instructions in your owner’s manual. Don’t have the manual? An online search will usually give you what you need, though you may need the model number to find the correct manual.
To do the job properly, you’ll need a dryer brush kit available at most big box stores like Lowe’s and Canadian Tire. It should have a big brush for cleaning the dryer duct and a smaller one for the filter area.
Once you have that, cleaning your dryer is basically a three-step process.
Remember to unplug the dryer or, if you have a gas appliance, to turn off the gas before servicing the dryer.
- Start with the lint filter. It’s location depends on the model of your appliance. It should be cleaned every time you use the dryer because it traps flammable lint and your dryer uses heat to operate. A simple wipe should clean the lint off. Every few months, use a soft brush, warm water and dish soap to scrub off the film created by fabric softener, then rinse and dry the filter well before reinstalling it.
- While you have the filter out, vacuum the housing covered by the filter using a fine hose attachment. Use the small brush from your kit to clean down inside the housing.
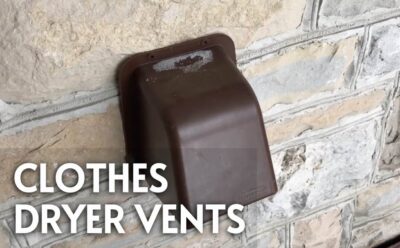
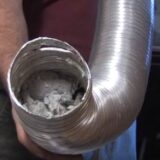
- Finally, at least once a year use the big brush to clean the large hose running from your dryer to the outside vent. You’ll need to pull the dryer out and disconnect the hose from the dryer and the wall to do this properly. If you use fabric softener, it’s a good idea to clean off the sticky residue with soapy water, then rinse the hose and let it dry well before re-installing. Don’t forget to vacuum lint from inside the dryer where the hose connects and to check the hose for kinks or other damage; replace if necessary. You also need to vacuum lint from the vent outlet on the exterior of your home. When you push the dryer back against the wall, make sure not to crimp the hose.
This video shows you how to clean and check the dryer hose and exterior vent to help keep your dryer safe from fire.
Tip: When you’ve finished cleaning your dryer, check the water supply hoses for your washing machine. If they are cracked or brittle, it’s time to replace them before they start leaking. The best hoses are stainless steel braided ones, available at building supply stores. They cost more than regular rubber hoses, but are your best protection against leaks and potentially serious water damage.
Don’t forget you also need to put your washer through a periodic washing cycle to keep it in peak condition.
Got a maintenance task you’re not sure how to do?
Drop us a line at info@allthingshome.ca or message us through Facebook.